Showing posts with label files. Show all posts

Saturday, 11 August 2012

Why Does Windows Take So Long to Boot?

Most of us have had a brand new computer at one time. It’s a great feeling. You boot up windows and within 30 seconds you are surfing the net, checking your email, or playing your favorite game. 10 months down the road things aren’t so nice anymore. You power up your computer and it seems to take forever to load.
Even when you are careful about what you install it seems that each day it takes longer for it to boot. It’s not your imagination – and there are a couple of good tips to keep your boot time short and sweet.
As always – backup your system before you start any of this. If you make a mistake you might need to restore from backup
Update (09/08/2006) – There has been some controversy about the prefetch folder. I think this issue needs to be looked into. I did have a reputable source for this information: It was the “Windows XP Annoyances” book by O’Reilly. Page 210. Titled “Keeping an eye on prefetch”

1. The prefetch cache
The first tip I want to talk about is the windows prefetch. Windows XP has this feature that loads commonly used programs – at boot time.
Here is how it works: Yesterday you used MS Word, and Duke Nukem 3D. Today you boot your system to check e-mail. It sees parts of these two programs in the prefetch folder and loads them into memory before windows completes the boot process. The benefit is faster application launch times. If you really wanted to use MS Word, it would pop up really quick when you double clicked on it.
The problem is most people have been running windows for years, and the prefetch gets clogged with stuff that you almost never use. Windows takes forever to boot because it is prefetching a 1.0 copy of Napster, and you just want to check your email before you have to go to work.
What can be done about it? Well there are a few things we can do to tweak the prefetch cache. One method is to disable it partially, and this can be done quite easily.
Simply browse to the windows folder (Ex: C:\Windows) and under there you should see the prefetch folder. Go into the prefetch folder and delete all the files (Careful! It should look like this c:\windows\prefetch) And here is a screenshot of one if you still have questions
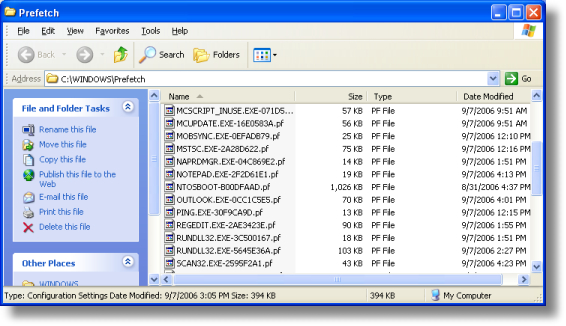
The first thing to note is the next reboot will be slow. This is because windows needs to relearn the prefetch for system files. Subsequent boots will run much faster since the sludge of programs has been removed, and only new ones are in the cache.
The trouble is that it will only help you for a while – until the prefetch gets clogged up again. We need to edit a registry key to tweak it. Open regedit and browse to this key:
HKEY_LOCAL_MACHINE\SYSTEM\CurrentControlSet\Control\Session Manager\Memory Management\PrefetchParameters
Under this key you should see a value named: EnablePrefetcher
It has 4 possible values:
0 – Disabled : The prefetch system is turned off.
1 – Application : The prefetch only caches applications.
2 – Boot : The prefetch only caches boot system files.
3 – All : The prefetch caches boot, and application files.
We don’t want to disable it entirely. This would actually make boot times *longer*. This is because this feature is also used to speed up the loading of boot files. That is why we are going to pick the number 2 option. It allows us to keep the advantage of caching system files, without continually clogging the system up with applications.
Set the value to 2 and reboot.
The 2nd time you boot it should boot much faster. Remember that the side effect is that launching individual applications once windows has loaded will now be slightly slower.
2. Hard drive fragmentation
Over time your hard drive will become fragmented. An over simplified explanation of fragmentation is when your files and folders are not all stored in the same spot. For example lets say you had a large movie file. If it were fragmented the first 5 megabytes are at the beginning of the hard drive, and then next 5 are at the end. It takes longer for windows to read the file than it would if it were all in the same spot. The point is that if each file is stored in a linear fashion, and the drive does not have to move all over the place to read it – it will load faster. XP has a built-in defrag tool, and it is simple to run. Open “My Computer” right click on the boot drive, and go to properties. Now click on the tools tab.
Click “Defragment Now” and the following window should appear:
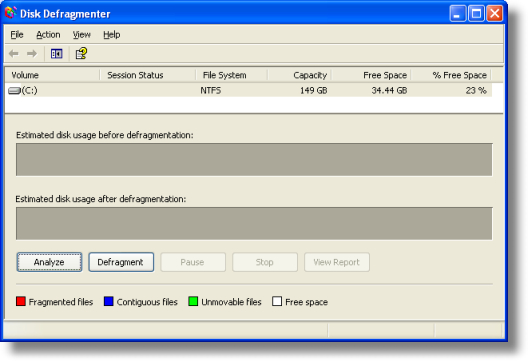
Before you click on the “Defragment” button you want to close all applications and be aware that it might take hours to complete. If you leave something running it might keep windows from completing the defragment operation.
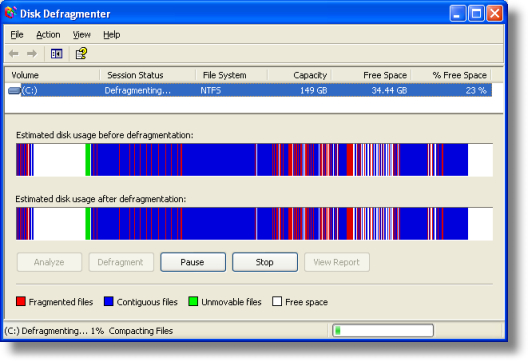
Click on the defragment button and you can walk away. Or you can watch it defrag your hard drive:
3. Disconnected network drives
I am using networked drives all the time. If you have ever put your machine on a network and connected to a shared drive, this can slow you down too. If you have a drive that is still mapped, but cannot be reached it will slow down windows during boot time. This is because windows will wait…wait…and wait some more for the remote server to respond. To clean these out open “My Computer” and go to the tools menu. Click on “Disconnect Network Drives” It will open a window that looks like this:
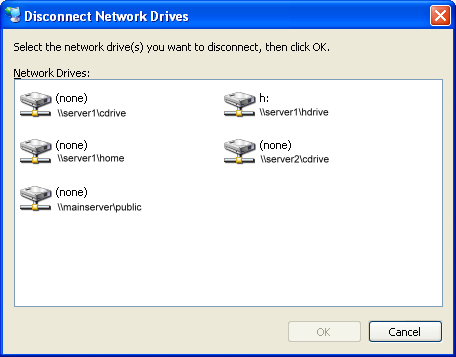
Click on the drives you no longer need, and click OK.
4. Spyware & Adware
These can have a big impact on your start times. If your PC gets loaded with spyware, it spends a large portion of its boot time making sure those pesky programs are loaded and ready to throw popup adverts at you all day. To check and clean your system of spyware there are three free programs that I highly recommend:
1. Microsoft Windows Defender
2. Ad-Aware
3. SpyBot Search And destroy
5. File and Printer Sharing
One other item that can significantly impact is the “File and Printer Sharing” feature within windows. Obviously, if you are sharing your printer, or folders you don’t want to disable this – so this tip is not for you. If you never use it, then why waste your time waiting for it to load?
Here is how to turn it off:
Go into the control panel. Click on “Network Connections”
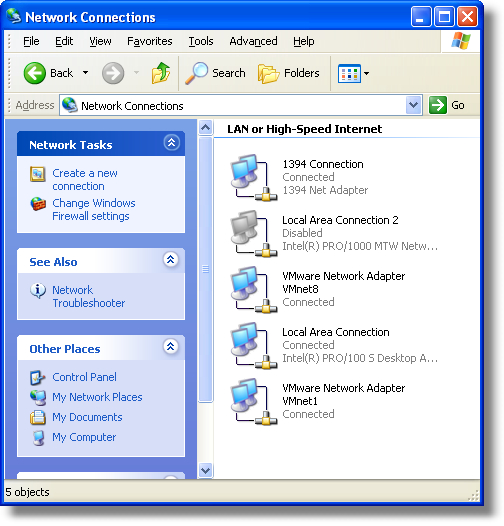
Now right click on “Local Area Connection” and click on properties
Uncheck the “File and Printer Sharing for Microsoft Networks”
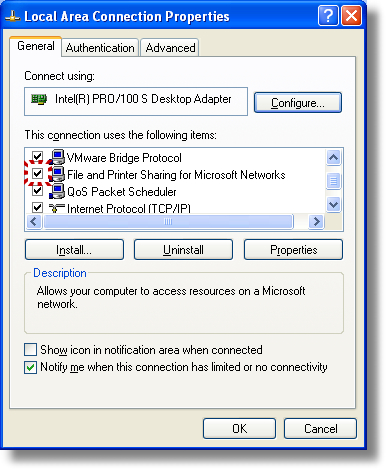
Click OK, and reboot.
That wraps up our windows startup optimization. And if you are tired of waiting for windows to shutdown, then check out our article on speeding that up too!
Stay tuned. We are about to release a new version of our Remote Reboot program. This version adds a feature suggested by David in our forum. It allows you to specify the shutdown reason that is written to the event log on Windows XP, and 2003. If you are not sure what I am talking about…this should remind you:
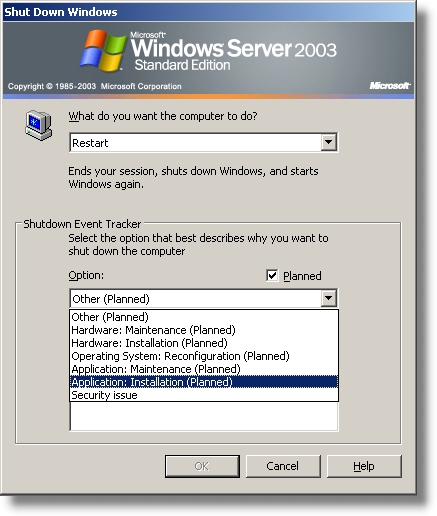
One final note, if you have any ideas for a free utility you would like to see, please post to our forum…or better yet check out the ones we already have
Protecting Your data in A CLOUD SERVICE ENCRYPTION

Storing Data In The Cloud With Dropbox And TrueCrypt


 it is important to protect data that you upload to the cloud. In this guide, I will show you how to implement one of the suggestions: Encryption. I’m using the cloud hosting and synchronization service Dropbox and the Open Source encryption software TrueCrypt for the example. In the end, you should be able to use the same method to protect data with your encryption software and cloud hosting provider of choice.
Lets take a look at the basics first. If you are a free Dropbox users, you get 2 Gigabytes of space. That’s usually more than enough to store documents and files in the cloud. Dropbox uses encryption to protect data on their servers from unauthorized access. As I pointed out before, that may not sufficient considering that the company may decrypt all files in a legal process, which also means there is a chance that an attacker might do the same. (Dropbox has responded to the issue)
TrueCrypt is an Open Source encryption software for Windows, Linux and Macintosh that can encrypt data containers or full hard drives or hard drive partitions. Since we only have a maximum of 2 Gigabytes of storage on Dropbox, we need to create an encrypted container to store our files in.
The basic idea is therefor the following: We create a TrueCrypt container on the local system. The size depends on your preferences, I would suggest to keep it as small as possible. If you run out of space you can either increase the size of the TrueCrypt container or create a second container to store additional data in. My suggestion is a maximum size of 500 Megabytes, if you can live with less select that number. My personal container has a size of 100 Megabytes.
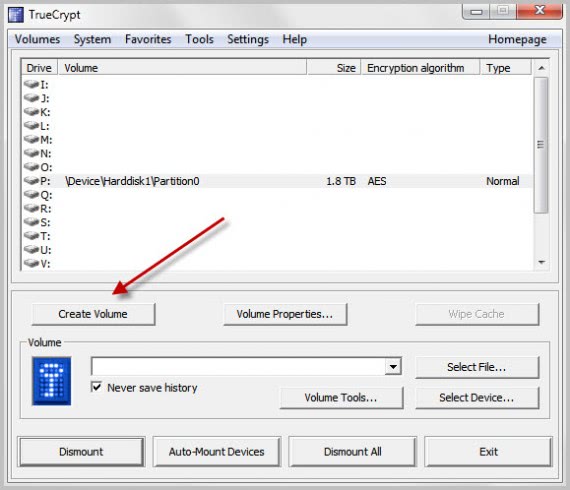
Download the latest version of True Crypt from the developer website. Install it and run it after installation. Locate the Create Volume button in the interface and click on it.
create truecrypt volume
Click Next two times on the following screens to create an encrypted file container with a standard TrueCrypt volume (those are the default options). Click Select File and browse to a location where you want to create the new container. Make sure it is not in the Dropbox folder if Dropbox is running. You can name the container anyway you want, e.g. holiday2010.avi.
Click Next on the encryption options page unless you want to change the encryption algorithm or hash algorithm. Select the volume size on the next screen. I suggest you keep it at a few hundred Megabytes tops.
You need to enter a secure password on the next screen. It is suggested to use as many characters as possible (24+) with upper and lower letters, numbers and special characters. The maximum length of a True Crypt password is 64 characters.
Now it is time to select the volume format on the next screen. If you only use Windows computers you may want to select NTFS as the file system. If you use others you may be better of with FAT. Juggle the mouse around a bit and click on format once you are done with that.
Congratulations, the new True Crypt volume has been created.
Move your unmounted new data container to the Dropbox folder. That folder, but not its contents since Dropbox cannot access those, will now be synced with your space in the cloud. It can take minutes to hours depending on the upload speed of your Internet connection and the size of the container that you have created.
But this is a one-time transfer. Dropbox will only transfer the changed bits after the first upload. This is theoretically a security risk as well but it would require lots of energy and dedication which means it usually can be neglected for personal data.
You can now mount the container on your local system and use it normally just like any other True Crypt volume. You can add, delete or edit files in it. Whenever you unmount it, it gets synced with your Dropbox account. This means that you need to unmount it regularly before you shut down the computer in order to sync the data with Dropbox.
Install True Crypt on all your other devices to access the encrypted volume there as well. You can also copy a portable version of True Crypt to the Dropbox for direct access without installation.

Problems

The biggest problem is that you cannot access the encrypted data on Dropbox’s web interface anymore. All you see is that one big encrypted container that you cannot access because you cannot run True Crypt on the cloud. There is no way around it: You either use the encrypted container for additional security, or trust the standard Dropbox encryption to access the data on the web interface as well.
You also need to make sure to mount the encrypted data container on one computer at a time. Dropbox would otherwise create a copy of the file in the Dropbox folder which would cause files becoming out of sync.

Verdict

If you want that extra bit of security, and eliminate the minor chance that someone manages to decrypt your data on Dropbox, or that Dropbox decrypts the data for law enforcement, then your best bet is third party encryption of the data. It may sound complex and complicated to setup, when it is a straightforward process that’s done in less than five minutes.

5 FREE SYSTEM CLEANERS REGISTRY CLEAN

Top 5 free registry cleaner software applications for Windows 7

Free registry cleaners software applications are very useful tools in removing registry entries that point to files that no longer exist in our computers. Registry cleaners help you clear garbage files from your computer hard disks and thereby create more space for your hard drive and even make your computer faster. As we install and uninstall applications from our computers not all its traces may be removed, when we browse the web our system may not necessarily get rid of all the junks left behind as cookies, browsing history, caches, passwords etc. The only way to get our system free of all these is to use registry cleaners, so I am going to introduce you to the top 5 free registry cleaner software applications. I hope you find them interesting as I did. Now let’s get started….

Top 5 Free Registry Cleaner Software applications:

CCleaner: CCleaner is my favorite free registry cleaner software application. It’s quite easy for anyone to use. I have written severally about CCleaner in this blog in the past. CCleaner removes unused files from the system allowing your computers performance to improve creating more disk space for you. CCleaner clears your browsers cache, clears your browsing history and fixes every registry error on your computer. You can even uninstall software applications with CCleaner.
Glary Utilities: Glary Utilities is  yet another free registry cleaner that is easy to use, can fix your registry errors, speed up your computer, maintain and protect your computer as well. Glary Utilities is a one-stop-shop utilities for optimizing and maintaining your computer for best performance. It can fix dogged registry errors, wipe off clusters, optimize internet speed, safeguard confidential files and maintain maximum performance. Glary utilities is the best alternative to CCleaner any day.
BleachBit: BleachBit is another free registry cleaner software application that can delete cookies, clear internet history, shred temporary files, delete logs, free cache and quickly create free disk spaces for your computer. This program is open source.
Xleaner: Xleaner is a free registry cleaner software application that can help you clear your system of junks and create free disk space on your computer. This application can improve your system’s performance by cleaning your recycle bin, windows temp folder, cookies, browsing history, cache, passwords etc. You don’t even have to install it on your PC, simply download and extract the files, Run the Xleaner.exe file and choose tasks to perform from the cleaner tab.
JetClean: JetClean is the last free registry cleaner software application on my top 5 free registry cleaner software application today. JetCleaner just as its name applies scans the entire registry in just few seconds and fixes any error it finds. Because of its lightweight it takes very little space in your computer, but offers great services to your computer. It can easily locate and delete junk files on your hard disk, recycle bin, recent documents, temp files, log files etc.
If you find above post on “Top 5 free registry cleaner software applications for Windows 7” interesting and useful, use the comment box below to share what you think of it.  Please share this post with your friends using the share tools on the left hand side of the browser or the ones under this post. Please if you haven’t liked our Facebook page simply click on the “Like” button on the right hand side of the browser. You can also follow us on Twitter right under the Facebook page.
I hope you read my blog post on “Spy Sweeper“. If you like this blog posts Subscribe to THIS BLOG Feeds by Email so you can be getting more of my posts on your email even when you are offline.

Youtube to MP3 DOWNLOAD

Youtube is one of the most popular website nowadays especially when it comes to viewing various kinds of videos. The youtube is one of the longest existing video viewing website and it has been helping a lot of people to be discovered and then eventually get famous because of the talent that they have but the lack of financial capability or courage to show it in public. Other than that, a lot of people also use youtube to listen to music.
There are huge amount of files or videos in youtube which just shows a particular background while playing music. Because of this, the viewers of youtube would now want to convert those videos into mp3 format because of several factors such as they want to save the it in their computer in a much smaller file size, they want to put it in their devices and just listen to the music or the song. In the earlier times, it was quite difficult for youtube videos to be converted into mp3 files but today, there are several easier and simpler ways to be able to do this with just few steps to remember.
You can convert youtube to mp3 format through online. There are several sites that offer this kind of service and this is considered as the easiest way of converting youtube videos to mp3 files because all you have to do is to copy the URL of the particular video that you would like to convert and paste that in the site which converts youtube video files to mp3. Almost all people also would choose this kind of way to convert youtube to mp3 because they don’t have to download the video itself before converting it but rather, the video converting site will provide a link for you to download the file in mp3 format.
If you don’t know how to do this and where you can find it, you can easily search it through search engines and it will just give you several sites which offers this kind of service. You will have the chance to try various sites where you will be most comfortable of using because each video converting website have different ways of navigation. In addition, these convert youtube to mp3 sites will let you choose the quality of the mp3 file and most options which will be given to you are standard quality and high quality.
The file size of the mp3 file will also vary on the quality that you will choose. Another way to convert youtube to mp3 is through downloading a particular software which has the capability of converting youtube files into mp3 format. You can also find various kinds of software which can do this. However, there are some software which will require you to buy it but there are still video converting software which are for free. This way of converting youtube files into an mp3 format will take more time than just using the online way of converting because there will be more downloading steps to do. These are the simple and easy ways of converting youtube files into mp3  format.       

Youtube is the biggest video hosting site on the internet and its owned by the almighty Google Inc. Videos are hosted on Youtube and can be watched by anyone from any part of the world for free. Have you ever seen a vide you so desperately want to have the audio but can’t find a place to download it in MP3? You don’t have to look any further because today I am going to teach you how you can Download MP3 from Youtube.

How to download MP3 from Youtube:

Follow the simple instructions below and download MP3 from Youtube. The process is a very simple one.
First visit Youtube and search for the video you want to download in MP3 audio format. Copy the URL right from your browser’s address bar.
Next visit CatchMp3 and paste the video url on the box provided for it and click on the “Catch!” button.
Then the video will be searched displaying the correct title and link of the video you pasted its url earlier. Click on the “Convert” button. Then you will be prompted to save your MP3 file in the location of your choice. I normally choose Desktop in this case. Choose your location and click Save.

Then the MP3 will be processed as shown on the image below.
On completion it will save the MP3 file on the location you chose earlier. Now i hope you can download your favorite MP3 songs from Youtube now.
If you find above post on “How to download MP3 from Youtube or other video hosting sites” interesting and useful, please share this post with your friends using the share tools on the left hand side of the browser or the ones under this post. Please if you haven’t liked our Facebook page simply click on the “Like” button on the right hand side of the browser. You can also follow us on Twitter right under the Facebook page.
I hope you read my blog post on “Download Youtube videos and other video hosting sites with KeepVid“. If you like this blog posts Subscribe to MY BLOG so you can be getting more of my posts on your email even when you are offline.