Showing posts with label tool. Show all posts

Saturday, 11 August 2012

Protecting Your data in A CLOUD SERVICE ENCRYPTION

Storing Data In The Cloud With Dropbox And TrueCrypt


 it is important to protect data that you upload to the cloud. In this guide, I will show you how to implement one of the suggestions: Encryption. I’m using the cloud hosting and synchronization service Dropbox and the Open Source encryption software TrueCrypt for the example. In the end, you should be able to use the same method to protect data with your encryption software and cloud hosting provider of choice.
Lets take a look at the basics first. If you are a free Dropbox users, you get 2 Gigabytes of space. That’s usually more than enough to store documents and files in the cloud. Dropbox uses encryption to protect data on their servers from unauthorized access. As I pointed out before, that may not sufficient considering that the company may decrypt all files in a legal process, which also means there is a chance that an attacker might do the same. (Dropbox has responded to the issue)
TrueCrypt is an Open Source encryption software for Windows, Linux and Macintosh that can encrypt data containers or full hard drives or hard drive partitions. Since we only have a maximum of 2 Gigabytes of storage on Dropbox, we need to create an encrypted container to store our files in.
The basic idea is therefor the following: We create a TrueCrypt container on the local system. The size depends on your preferences, I would suggest to keep it as small as possible. If you run out of space you can either increase the size of the TrueCrypt container or create a second container to store additional data in. My suggestion is a maximum size of 500 Megabytes, if you can live with less select that number. My personal container has a size of 100 Megabytes.
Download the latest version of True Crypt from the developer website. Install it and run it after installation. Locate the Create Volume button in the interface and click on it.
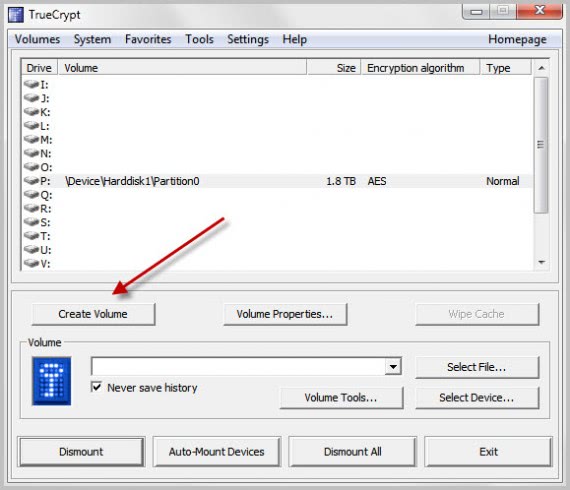
create truecrypt volume
Click Next two times on the following screens to create an encrypted file container with a standard TrueCrypt volume (those are the default options). Click Select File and browse to a location where you want to create the new container. Make sure it is not in the Dropbox folder if Dropbox is running. You can name the container anyway you want, e.g. holiday2010.avi.
Click Next on the encryption options page unless you want to change the encryption algorithm or hash algorithm. Select the volume size on the next screen. I suggest you keep it at a few hundred Megabytes tops.
You need to enter a secure password on the next screen. It is suggested to use as many characters as possible (24+) with upper and lower letters, numbers and special characters. The maximum length of a True Crypt password is 64 characters.
Now it is time to select the volume format on the next screen. If you only use Windows computers you may want to select NTFS as the file system. If you use others you may be better of with FAT. Juggle the mouse around a bit and click on format once you are done with that.
Congratulations, the new True Crypt volume has been created.
Move your unmounted new data container to the Dropbox folder. That folder, but not its contents since Dropbox cannot access those, will now be synced with your space in the cloud. It can take minutes to hours depending on the upload speed of your Internet connection and the size of the container that you have created.
But this is a one-time transfer. Dropbox will only transfer the changed bits after the first upload. This is theoretically a security risk as well but it would require lots of energy and dedication which means it usually can be neglected for personal data.
You can now mount the container on your local system and use it normally just like any other True Crypt volume. You can add, delete or edit files in it. Whenever you unmount it, it gets synced with your Dropbox account. This means that you need to unmount it regularly before you shut down the computer in order to sync the data with Dropbox.
Install True Crypt on all your other devices to access the encrypted volume there as well. You can also copy a portable version of True Crypt to the Dropbox for direct access without installation.

Problems

The biggest problem is that you cannot access the encrypted data on Dropbox’s web interface anymore. All you see is that one big encrypted container that you cannot access because you cannot run True Crypt on the cloud. There is no way around it: You either use the encrypted container for additional security, or trust the standard Dropbox encryption to access the data on the web interface as well.
You also need to make sure to mount the encrypted data container on one computer at a time. Dropbox would otherwise create a copy of the file in the Dropbox folder which would cause files becoming out of sync.

Verdict

If you want that extra bit of security, and eliminate the minor chance that someone manages to decrypt your data on Dropbox, or that Dropbox decrypts the data for law enforcement, then your best bet is third party encryption of the data. It may sound complex and complicated to setup, when it is a straightforward process that’s done in less than five minutes.

Utility Spotlight RichCopy

Utility Spotlight RichCopy


Code download available at: HoffmanUtilitySpotlight2009_04.exe (5,896 KB)


Back in the November 2006 issue of TechNet Magazine, I wrote about a handy little utility called Robocopy GUI (see "Utility Spotlight Robocopy GUI"). This simple tool was written by a Microsoft engineer named Derk Benisch, and all it really did was create a graphical interface for the very popular Robocopy command-line utility, which provided file copying capabilities far beyond what was built into Windows. Believe it or not, more than two years later, the Robocopy GUI article remains the single most popular piece of content we've ever published, having been viewed well over 220,000 times.
Needless to say, this speaks far more to the value of the tool than to the quality of my writing. Nevertheless, it also makes perfectly clear just how crucial certain simple tasks are in our day-to-day lives, and how staggering an impact even a small improvement in performing those critical tasks can make.
In this case, we're discussing the simplest of tasks: copying files. Except copying files is not always that simple. What if you're copying thousands of files across a slow connection? What happens if your network hiccups and interrupts the copy? What if you want to make sure that you preserve particular file attributes, such as a Last Modified date, but not other attributes, like security descriptors? What if you want to filter the files you're copying from source to destination based on filename or extension?
If any of these apply to you, the simple Ctrl+C/Ctrl+V combination probably won't cut it. And though Robocopy GUI certainly improves on that basic functionality, it still has some limitations in terms of granular control and usability. What you need is RichCopy.
RichCopy is a free utility that comes to us from Ken Tamaru of Microsoft. The tool was first developed in 2001 and has been updated regularly to keep pace with evolving needs. Trust me when I tell you, this is the answer to all your file copying needs. What you'll find most striking the first time you take RichCopy out for a spin is that it's a multithreaded copying tool. That means that rather than copying one file at a time in serial order, RichCopy can open multiple threads simultaneously, allowing many files to be copied in parallel and cutting the total time required to complete the operation several times over. You can also pause and resume file copy operations, so if you lose network connectivity at any point, you can just pick up where you left off.
Of course, these are really just the simplest features of RichCopy. As Figure 1 shows, you also get a vast array of granular controls that allow you to customize all of those fancy aspects of your file copying that I talked about earlier—filtering files, saving attributes, adjusting cache size, and so on. If you regularly copy lots of files over the network or between various storage devices, these features will significantly ease your daily life.


One of the Microsoft tools that was being used by Microsoft programmers to copy or move files in faster speed. This tool was developed in 1996 but it was being used internally by Microsoft and was not made available for public usages. However, at a later stage they made it available for free public download
and now you can also experience faster file copying and moving with this small Windows utility, called RichCopy.

RichCopy can copy multiple files.

at a time with up to 8 times faster speed than the normal file copy and moving process. Surprisingly it copies and moves files even faster than RoboCopy tool and XCOPY command. Since the tool was being used by the developers, they made it pretty effective and stable
.

download Microsoft Rich copy 4.0

Key Features of RichCopy

1. More powerful, faster and stable than than any other file copying tool.
2. Create several profiles to assign special settings with a specific profile.
3. Copy files from multiple and different locations and save in a single destination.
4. Filter the files based on the date, time and choose to either copy or opt those files.
5. Being on GUI, supports command lines.
6. Suspend and resume file copy at any time.